12 October 2012
Art From My Heart
10 May 2011
18 March 2011
Layers and Detail
I came across the following description while glancing through some of my older pics on Flickr. Clearly, I document process & technique for sharing and for the fun i get out of looking back at something I created a few years ago.
"Truthfully, you don't realize how much work goes into these tiny treasures until you list ALL OF THE STEPS it took to create it!
13 Steps:
- patterned paper background,
- 2-3 colors distress ink
- taped to pre-printed "BACK" (name/date/email)
- stamped flower using clear ink,
- heat-embossed with copper - embossing powder,
- glued number transparency to background.
- matted printed photo onto torn vintage book page,
- distressed with ink
- cut square of blue mesh
- "popped" to card with foam tape.
- glued cardboard number
- edged with black sharpie
- glued purple microbeads to flower center
best friends forever ATC - created 0309"
15 December 2009
15 November 2009
24 March 2009
You Are Special

"best friends forever"
3 weeks ago I made this ATC for a very special friend and, when I see her on Friday, I will finally be able to give it to her.
The backstory is that she came into my life under extremely trying circumstances. Raised by her single father and grandfather and at barely 9 years of age, her dad was tragically killed in a one-car accident. Yes, heartbreaking, but there is much more to this that I can't share. As a result, we have opened our hearts to each other and the healing process continues. Outside of immediate family, she has trusted only ME with her story and I am honored to be her friend. UPDATE 03/28/09: today will be our second "go" at altering her Poetry Journal together. We plan to add lots of secrets in magical little hiding places, so stay tuned!
The way we were brought together, and she agrees with me, proves that there is no such thing as coincidence. Especially when you realize that the root word is "coincide!" (For all you linguists, more here.)
Over many years we have developed a special bond that can NEVER be broken ~
...not in this world...
...or in the next...
19 March 2008
Irish Heritage
(Husband below) Laura's father, Samuel T. Murphy was the Mayor of Gloucester City, NJ in 1872, when she was 13 years old. There's no doubt that she's Irish... I am still tracing her origins!

joseph edward farquhar 1856-1926
(my maiden name) This branch of my father's family tree, has been traced 6 generations (I am the 7th) to 1777 in Ballinahinch, County Down, Northern Ireland. Joseph's father, Thomas, was born in Ireland in 1811 and along with his wife, Elizabeth, three daughters and two sons, sailed to this country from Glasgow on the ship "Ticonderoga, of the Cape." They eventually had 17 children, sadly, many of them did not survive. His first residence was in Philadelphia where he established a distillery and a shawl weaving mill. He later had a bakery across the street from his home. Next he moved his family to Gloucester, NJ as the Civil War began, purchasing a double lot & frame house where he conducted a bakery & carpet weaving mill.
My lovely aunt Laura, our family historian and matriarch, has just turned a robust 91 years old this month! Happy Birthday, dear aunt and fellow Piscean! She is her grandmother, Laura Adella Murphy Farquhar's namesake and I mention her here for two reasons. Through tireless research, she has provided our family with all of the historical data for these two individuals AND because she recently presented me with a Farquhar-family heirloom: a 71" x 68
EDIT: great-grandfather had a rebellious streak!

rebecca brown 1866-1941
From my mother's branch of the family tree, Rebecca was born in Coleraine, County Londonderry, Northern Ireland. I have inherited a gorgeous, handmade
13 June 2007
Mermaid Swap
These four cards are for a swap on the Yahoo group, Altered Art Obsession. They went postal and are in the air right now, somewhere between Connecticut and Seattle, Washington!15 April 2007
..the man of my dreams

I used a Making Memories date stamp kit, rubber stamped the right-hand border then glued the text and other paper items followed by a coat of glaze. A black sharpie was used to define the edges.
24 March 2007
How Distressing!
For me, a KICK usually starts when I come across a new technique, either from my book collection or from a discussion in one of my yahoo groups. This time it all started with crackle (and Marion, you're to blame for that). So, when I can no longer resist the temptation, I make the one hour round-trip to either Michael's or Joanne's (both are sub-par IMO) and buy a new product (crackle medium). That was about 2 weeks ago. Yesterday I ventured out for a second time and bought about 20 bottles of acrylic paint known as SUPPLEMENTAL supplies to feed the growing addiction! (on sale ~ $.50 each.)
Once DH went off to bed (hehe) I spread out the "booty" and this is the result: 2 of the 6 cards that I made!

"Zig Zag Summer" was made by painting both Plum & Wine acrylic paint separated by a layer of crackle medium. The picture doesn't show much contrast and neither did the original! SO I dabbed on a little bit of white Gesso, and once almost dry and still a little tacky, I sanded it in places.The yellow, star-shaped brads are new, too!
18 March 2007
Tutorial from Luminarte, Inc.
Check out this great tutorial on how to combine Twinkling H2Os with your rubber stamps from Leslie Blackburn Ohnstead, president of Luminarte, Inc.
~ how I made this card ~
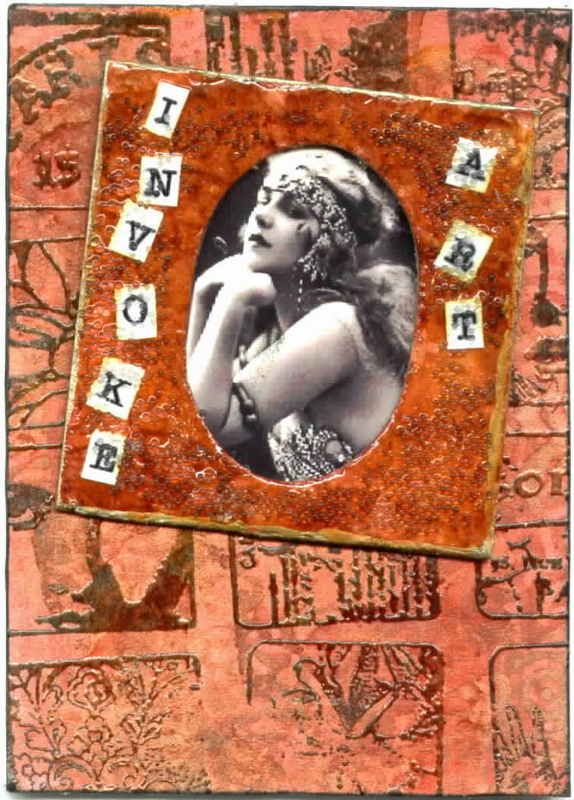
Supply list: white cardstock blank, Twinkling H2Os, yasutomo waterbrush, black Versamark ink pad, clear embossing powder, collage stamp, clear micro beads, Glossy Accents by Ranger, printed letters, B & W image, glue dots, sharpie, gold paint pen, double-stick tape
The background of this ATC was made by first painting cardstock with Twinkling H2Os in Persimmon. Because there is mica in these shimmering watercolors, the iridescence doesn't completely show up in the scan.
- Next I stamped a collage stamp in black and embossed with clear embossing powder.
- Next I dabbed on a little red & yellow alcohol ink for a softer, more distressed look.
- The same shade of watercolor was used on the slide holder to which I added some cut out letters to spell "INVOKE ART."
- So as not to compete with the rich color palette, I found a pretty black & white photo to take center stage. I attached it to the back of the slide with double-stick tape, using glue dots to adhere it to the card.
- Once the surface was completely dry, I spread Glossy Accents (http://www.rangerink.com/) and dropped clear micro beads into the glaze. Gold paint pen was used to edge the slide and a black sharpie to edge the ATC.
Now go find some room on your desk and MAKE something! I'm headed to my studio to "clear a path" which is sad but, oh so true!
16 March 2007
"Christy Girl" - An American Icon
"Vintage Winged Folk"14 March 2007
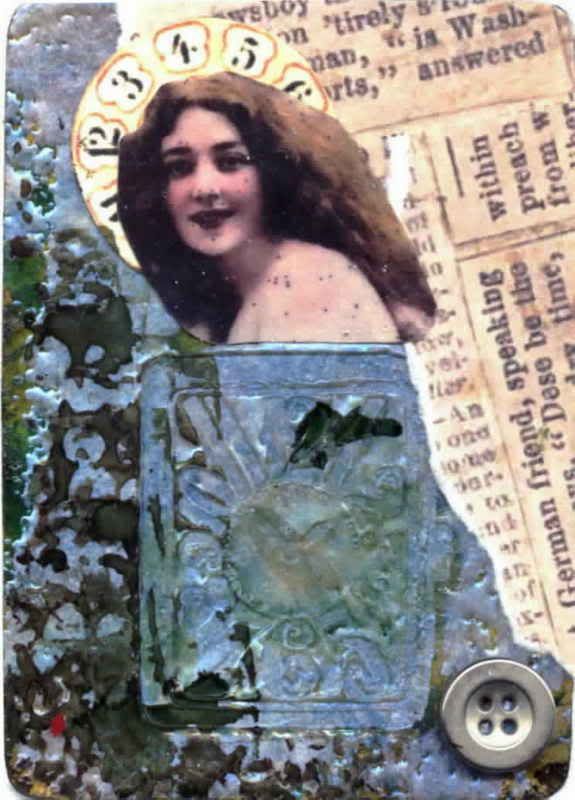
Precious Eternity
To make the card:
- I took a blank ATC, covering 1/2 with clear "pigment" ink
- Added 3-4 layers of UTEE, heated with embossing gun
- Pressed a rubber stamp into it while warm
- Added blue and green alcohol inks
- covered the rest of the card with torn paper
- cut another image, added a halo from a vintage "fortune teller's card"
- metal embellishment
11 March 2007
technique: CRACKLE!!

Let me explain.....
- I painted the card green, let it dry somewhat
- Spread crackle medium with my fingers. (quick crackle by Duncan)
- To shorten drying time, I hit it with my embossing gun being careful not to allow the surface to bubble.
- Added a swipe of gold acrylic paint, used embossing gun again.
- Then sanded it off. I also added a little bit of Adirondack Mixatives in copper.