15 December 2011

happy hands

are busy hands!

Hands that LOVE to make the world a better (and prettier) place! Doctors, Gardeners, Songwriters, Artists, Dog Groomers, Photographers, Caregivers, Massage Therapists, Midwives, Authors, Musicians, House Painters, Hair Stylists, Architects.. there are millions of ways we C.R.E.A.T.E. and give back with our hands.

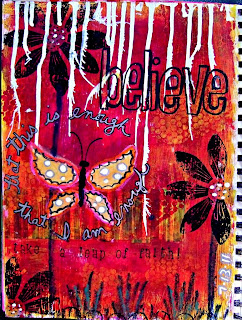
I started to see and feel the signs of arthritis, most notably in my hands, right around the time I rediscovered my artistic nature. Like many, I am a self-taught artist and over the past few years, it has come to define me. Whenever I find myself projecting to a time in the future when they may no longer work for me, it also serves to heighten awareness of all those that work with their hands and do it through PAIN and I decide to focus instead on the health that I have today ~ right now.

Spanning a four-decade career, I've worked mainly in sales yet there was a time when I had the chance to work with my hands! You can read about it in an earlier post.

The idea to write this "homage to hands" came from that aching feeling I get following a photo restoration project, perfecting line, color, exposure and possibly DUST on the original negative and therefore making about a million MOUSE CLICKS to preserve this lovely photo of my lovely (now 88 year-old) mother. And I wanted to share it with you!

03 December 2011

Art Journal Page 2Dec11

A few weeks ago, I decided to prep a few pages in my 8x5 moleskine sketchbook to help jump-start the journaling process. I started with a light application of white gesso, used a babywipe to blend in neocolor II wax crayons and stamped a repeating image with black staz-on.

Next I glued the photo in place and covered the left side with clear gesso. This helps to remove any sticky residue left behind, protects the 1st layer of color and adds texture, or "tooth."

Last night I finished this simple spread with a few doodles, a mhendi-style mandala and some random thoughts on my love of LETTERING. These finishing touches were inspired by Samantha Kira's cool, new email-based class, called Journaling Deep! This is a year-long class which costs only $10/month... and you can opt out at any time... or not! So, please be sure to check out a few of her (57) videos, here.

Sakura Pens used:
Gelly Roll MED White
Gelly Roll Metallic
Gelly Roll Souffle (kind of a mint green)

Bic Pen

28 November 2011

Technique: background layers


- PAINT/GESSO: the page started with an acrylic paint mix of a fairly bright turquoise blue & neon red which became this very interesting blue/grey. next i used a credit card to scrape a thin layer of white gesso,
- NEGATIVE STENCIL: once the 2 layers were fairly dry, I used this technique with an alpha stencil, a spray bottle, baby wipe & a paper towel. You can see the vertical "W V" in the center on the left side.
- BIC PEN: traced a different (backward) alpha stencil with a pen
- COLLAGE: cut, glued and painted several shapes from a found postcard. small pc of sheet music.
- PAINT MARKER: traced a third stencil using a mechanical pencil, due to it's small size then traced over it with a red Sharpie Paint Marker.
- NEO COLOR II: don't you just love the rich pigment of this crayon set? Used a wet application of orange for the border.

02 October 2011

Farquhar Family: Julia


Our dear grandmother was an actress & a performer at heart, illustrated by her glamorous pose and the "come-hither" expression in her eyes. Having a great sense of humor, no doubt she was simply joking around for the camera!!


At her happiest on stage, julia was born in an era where good methodist girls did NO SUCH THING! And although I can easily imagine she had dreams of bigger stages, I am grateful that she was able to satisfy at least PART of those dreams by devoting as much time as possible singing in the choir, also as a soprano soloist, acting in church plays, performing piano recitals and even accompanying a silent film or two, I've been told.

PERFORMANCE was the breath in her body, the light in her eyes and the fire in her heart. Sadly she was tied down with 4 young children by the time she was 30 and dealt with much stress and strife in her homelife throughout the decades. I have a strong feeling there was alot more beneath the surface, a true ARTIST, if anyone took the time to really know her. I love her and acknowledge her bright spark and the creative juices that flowed through her veins.


Thank you, mimi, for that part of you... inside of me. XO

12 September 2011

Flea Haul

Do you love the joy of the hunt as much as I do? It's so darned rewarding to repurpose and recycle ~ plus I love finding something beautiful that has a time-worn patina!! Well, I finally remembered to share my haul pictures from MAY... because there were so many sweet little treasures I wanted to share! Funny story: just before that weekend, I had a dream about a straw handbag and decided I wanted to find one for the summer... sort of like the ones I used to carry in my college/disco days, lol. When i spotted one for $4.00, YOU KNOW I didn't hesitate!

It was so rewarding to find 2 huge rolls of plain white paper for painting collage papers and three cute little plastic tools: an alphabet stencil, shapes stencil and a paint scraper, all for around $1.00!

Well, I have to confess that there were two extravagences that set me back about $30 ~ (which is why I don't go very often) ~ the stunning RED ROSE tablecloth from the 1940's and the gorgeous pair of crystal earrings which I will most likely upcycle into one of my own jewelry designs.

The little scotty dog is a cream-colored cigarette case from the 1930's which I just couldn't part with. (was thinking of selling on ebay) I currently use it to hold my business cards and just adore that it pops open when you give it a gentle squeeze! A great little conversation piece.

Other items: cabinet card, cute vinyl make-up case, cross pendant, 2nd pr of earrings, lace table runner (on my kitchen table), a precious journal and an extra large piece of vintage sheet music!


10 September 2011

Art Journal Fodder: Craft Foam


Thrift shop find!

Cut from a sheet of craft foam, there are two ways to play peek-a-boo! You can choose to reveal the POSITIVE/stamp or the NEGATIVE/stencil (or BOTH).

To use as a stencil, simply fill a spray bottle with watered-down paint or dilute alcohol ink in a small amount of household rubbing alcohol. To use as a stamp, brayer or use your fingers to spread a thin layer of paint onto a smooth surface, I use a 8x8" ceramic tile, press and stamp!

Tools used: pen, craft knife with a fresh blade and an "anywhere" punch!

27 August 2011

Art Journal Page 7Aug11


STEPS 1 + 2
Paint! Whoever said, "once you use paint in your art journals, it becomes addicting," was right! There's nothing more fulfilling than laying down that first layer of color, usually after I've applied a layer of gesso with a cheapo "chip brush."

APPLICATION
I prefer to use a credit card to apply my acrylic paint because it's fast, clean-up is easy (keep a shallow bowl near-by, filled partially with water - or clean off immediately with a baby wipe or a rag), you use less paint and the BEST PART is that your pages won't stick. Rather than wasting leftover paint, just scrape it onto future pages (see my next post!)

TECHNIQUE
Start with a lighter color. Then, after scraping the 1st layer of paint across your page, scrape a dark or medium shade overtop of it. Next, use your fingers to drip random drops from a glass of water or block the nozzle on a spray bottle with a finger, for larger "glops!" Wait about 1 minute, blot the excess water with a paper towel and SCRAPE to reveal the lighter color underneath. Keep adding water, as needed.

LAYERS
Paper and I have always had this love affair. 10 years ago, i referred to myself as a "paper artist" and I've got a room-full to show for it! Vintage magazines, nat geo (used here), old dictionaries, ledgers, primary schoolbooks, ephemera, postcards, cab cards, sheet music, scrapbook paper, cardstock... the list goes on. So! it's super fun to incorporate that extra layer either before or after gesso or in between paint layers.

Another layer that's a must for me is using handcarved stamps and grabbing something from my "mark making" collection such as bubble wrap, sequin waste (used here), old shower curtain grommets, corks (used here)...


24 August 2011

the uglies


we all have 'em... in our Art Journals, that is! "let the inspiration flow" - guess it wasn't flowing MY way, that day, lol.

I've read both sides of the keep it or paint over it discussions, and truthfully, only you can make that call. For me, I got depressed every time I looked at it. About 5 weeks passed, I bought a few alphabet stencils in a Thrift Shop and had an "AHA" moment. Next, I simply pulled the tape off -used a little red acrylic paint and a spouncer to re-do the title. (luckily the old one was on masking tape!!) And... SCORE!

20 August 2011

Earrings: August 2011

Thanks, Gaby, for the inspiration!! XO


16 August 2011

Earrings: June 2011

Before I post a whole new batch of designs, I wanted to catch you up to date on a small sampling of the earrings I made for a local Art Show in early Summer. These eight pairs are currently on display in a retail location, and through a special arrangement with the owner, they are also available for sale in my Etsy shop, where I can create a custom listing if you spot something you like!

Convo me here or in my etsy shop!


12 August 2011

Basic Stamp Carving

more stamping by cookievf
more stamping, a photo by cookievf on Flickr.

Why buy basic shapes when you can carve them yourself! A few months ago I managed my first attempt at basic carving with a Speedball lino cutting tool and a block of flexible, pink Speedy-Carve. Dick Blick carries a 9" x 11 3/4" sheet for $21.00. Erasers are great for carving too!. And don't forget to save your wine corks :D

I stamped this "sample set" with a brown pigment inkpad on a sheet of blank newspaper; a nice weight to use in collage. I also used it to make my painted background papers, shown in an earlier blog post and on flickr as well. View the carved stamps and the painted papers here.

05 August 2011

Art Journal Page 18Jul11

painted a wash of green paint over a self-portrait,


"crackle" rubber stamp cube, in brown ink,


torn pieces of vintage wallpaper,


new fave color duct tape,


deco tape,


pink porfolio oil pastel,


applied molding paste with corrugated cardboard for texture.

29 July 2011

Art Journal Page 13Jul11


Products/techniques used:
- Gesso is always my first layer.
TIP: I prep all of my pages with gesso first for several reasons. 1) Using a "chip brush" gives me added texture, 2) laying down a solid, opaque white base makes my colors POP, 3) gesso prevents the paint from soaking into the paper so, again, more pigment is visible.

- Several layers of acrylic paint were scraped on with a credit card.


TIP: If you don't want your colors to blend, sometimes creating a muddy appearance or (GASP!) turning brown, then use a blowdryer or heat gun drying each layer of paint completely. This will ensure that each color remains pure.


- Bubble wrap or sequin waste!


- I added the white drips across the top of the page using Speedball white calligraphy ink.
TIP:
Blowing paint or ink drips with a straw helps to spread it out and pushes the liquid further down the page.

- The butterfly wings are torn vintage ledger paper and are colored with sharpie "metallic" and poster paint pens.

- Just above "take a leap" I applied several strips that I cut out of a magazine ad.

TIP: I always try to use collage for added texture and layers. If you adhere them with gel medium or mod podge, be sure to cover the top as well. After painting over collaged bits, this gives you the option of wiping some of it away allowing some of the image to show through. Clear gesso works also.

- I used a hand-carved petal stamp to make the flowers with black staz-on ink.

- The flower stems and grass are portfolio (water soluble) wax pastels.
TIP:
For a softer look, you can paint over portfolios with a wet paintbrush. Or you can leave them AS IS, like I did, for more of a handmade, distressed, even childlike effect.

- The text around the butterfly was written using a silver metallic sharpie and outlined with a Pigma micron pen.

- Alphabet stamps for "take a leap of faith" are Sunny Lower Case by Hero Arts.

TIP: When stamping letters, to avoid running off of the right edge of a page, start at the edge and work backwards. To center text or a title, stamp the middle letter and work outwards.

Have fun and be sure to leave a comment if you try one of these tips!
Please feel free to share one of YOUR favorite tricks/tips?